1. Please download Sketchup2017 from Self-Service and install it.
2. While you are waiting for it to download and install please review Technical Sketching Slideshow.
3.Download and Open the TMS SketchUp Template
4. Agree to the Users Agreement
5. DO NOT REMOVE LICENSE!!!!
6. Click on Template
7. Scroll and Click on “Interior and Production Design – Inches”
8. Click “Start using SketchUp”
9. Go to File -> Save As Template…
10. Name the Template and make sure the check box that says”Set as default template” is checked.
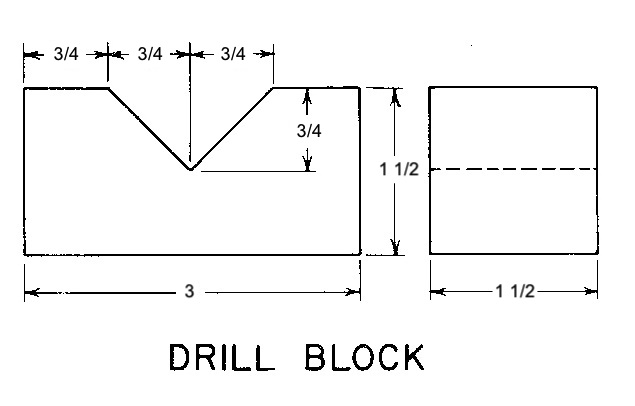
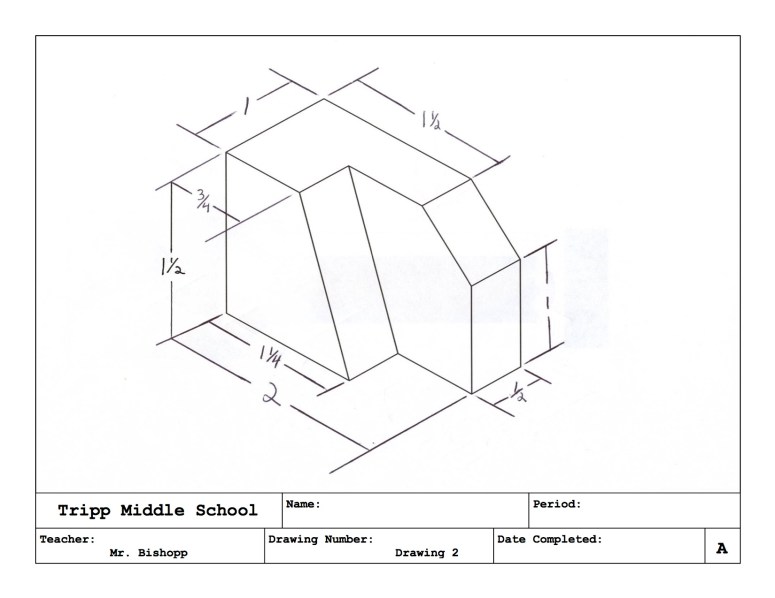
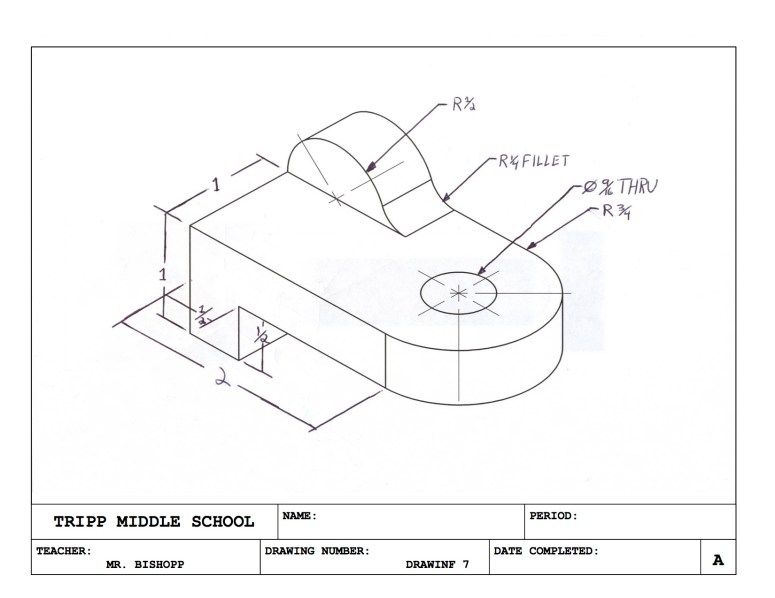
1. Using the Drawing to the Left as a Model
2. Start but using the Rectangle Tool
3. Click on the Origin then pull the cursor left and up
4. Type “3,1.5” then hit return
5. Use the line tool, click, and draw a line from the top corner (Green Circle) then pull it down the top on line (Red Square)
6. Type “.75” and hit return
7. Use the line tool, click, and draw a line from the Endpoint of that line (Green Circle) and pull straight down (Blue Line)
8. Type “.75” and hit return
9. (Green Circle)
10. Use the line tool, click, and draw a line from the Endpoint of that line (Green Circle) and pull straight Right (Red Line)
11. Type “1.5” and hit return
12. Use the line tool, click, and draw a line from the Endpoint of that line (Green Circle) and pull straight up (Blue Line) until it lands on the top line again (Red Square)
13. Using the Erase Tool erase all the lines you do not need
14. Click on Camera -> Standard Views -> Iso
15. Use the Push-Pull Tool and click on the surface of your shape.
16. Type “1.5” and hit return
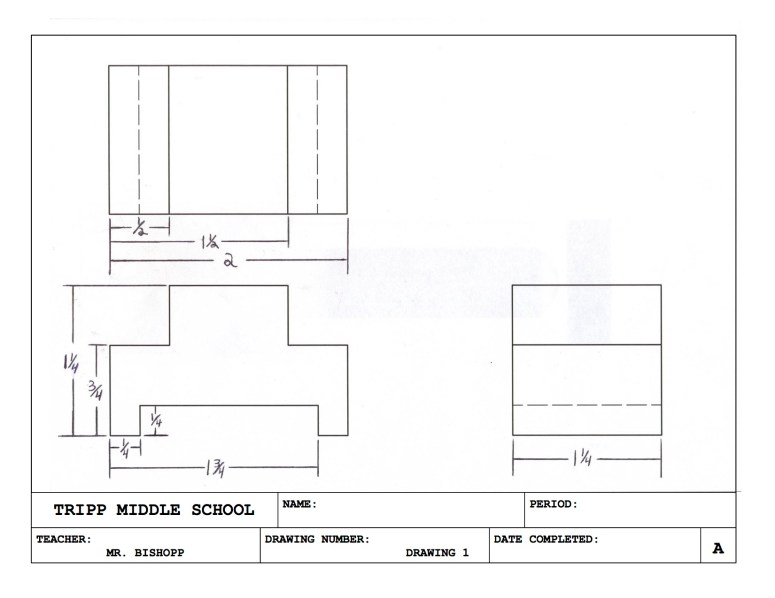
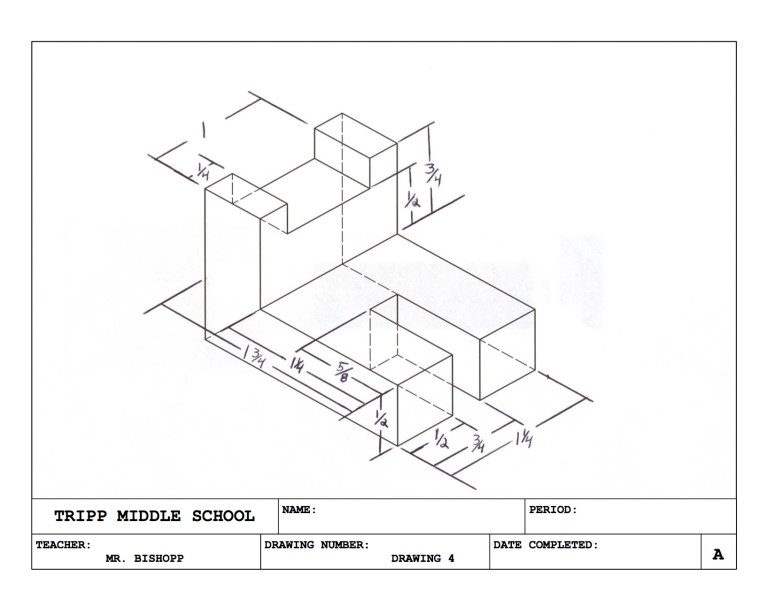
Open a new File and using the drawing to the Left create the shape for Drawing 1. When complete save as DWG 1 and then go to the next section.
Layout
- Open Layout
- Download and Open the TMS Title Block
- Template Information
- Using the Select Tool, Double Click on <Student Name> and in all caps type YOUR NAME
- Using the Select Tool, Double Click on 1W and in all caps type your class period and color
- Using the Select Tool, Double Click on Mr. Bishopp and replace it with MR. BISHOPP
- Click Window and turn on or off so that ONLY the following are open or checked
- Shape Style
- Dimension Style
- Instructor
- Click on the Dimension Tool
- Change the “Stroke” to 0.4pt
- Change the “Start Arrow” to an actual arrow and 0.5pt
- Change the “End Arrow” to the same arrow and 0.5pt
- Change “Leader Style” to One Segment
- Ensure that it looks like the example
- Save as a Template
- Click File
- Click “Save As Template”
- Name the File “TMS TITLE BLOCK”
- Click “Save”
- Placing the Drawing
- Click File
- Click Insert
- Find your .skp file
- Either right click or hold down Control and Click on the Drawing
- Click on Standard View
- Click on Front
- Either right click or hold down Control and Click on the Drawing again
- Click on Scale
- Click on Full Scale
- Copy and Paste the View then move it up
- Change the Standard View to Top
- Using the Line tool from the top Front View draw a line straight up 1 1/4″
- Drag the Top View in line with the Front View
- Repeat process for the Side View
- Save
- Click File
- Click Save as…
- Use the Filename DWG 1, place it where you would like the file stored, you will need to go back to it again
- If done correctly the Drawing Number should now say “DWG 1”
- Dimensions
- Click the Dimension tool
- Click on the lower left corner of the Top View
- Click on the next Object Line to the right
- Pull the Dimension down enough to make it clear and easy to read
- Click on the lower left corner of the Top View
- Click on the third object line
- Pull the Dimension down enough to make it clear and easy to read
- Click on the lower left corner of the Top View
- Click on the lower right most corner of the Top View
- Pull the Dimension down enough to make it clear and easy to read
- Repeat this process to all the other views until your drawing looks like the example.
- Save and Print